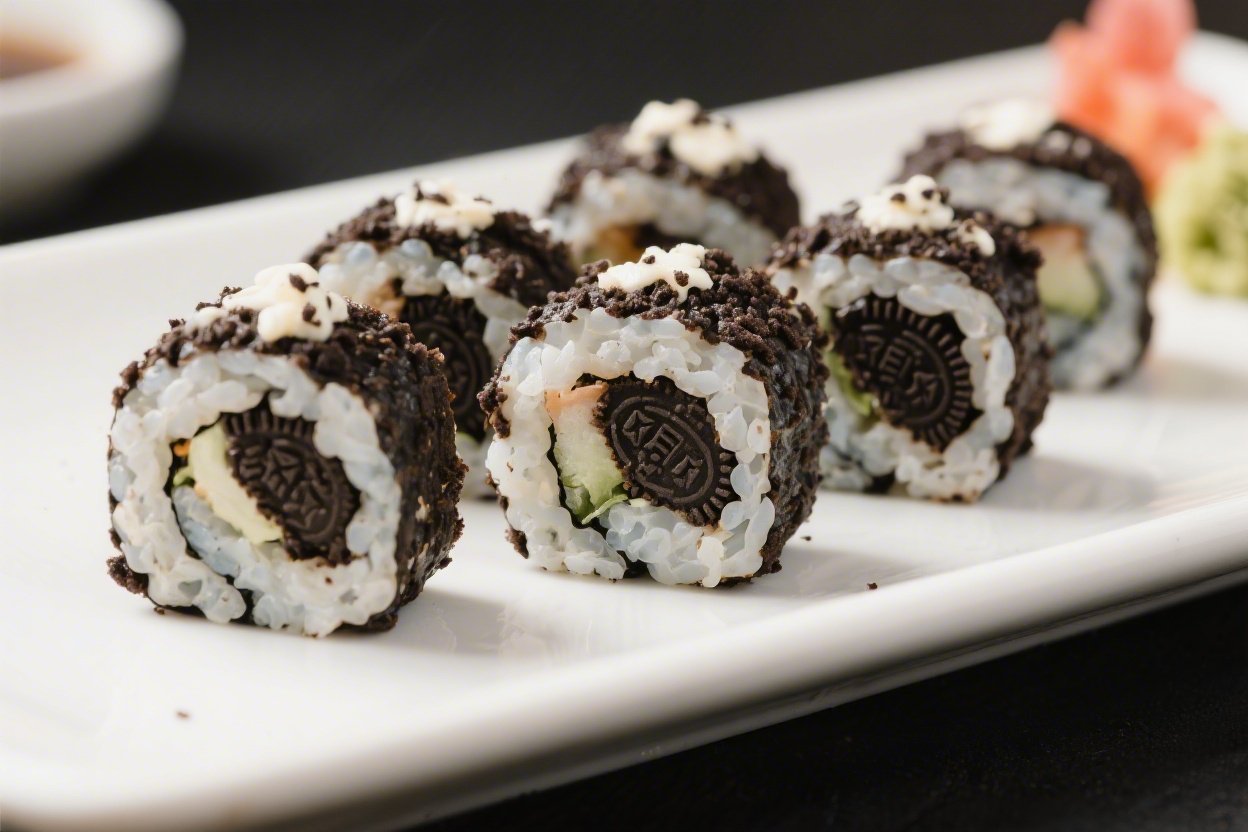
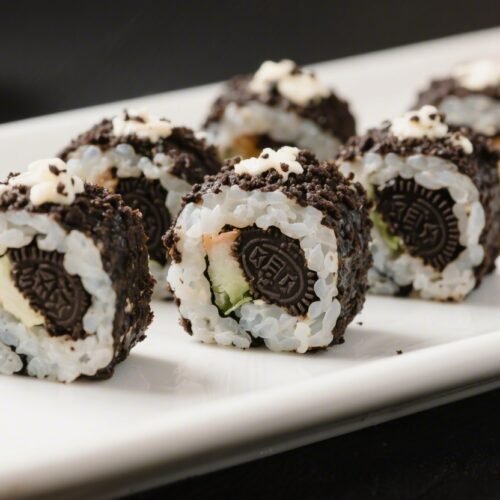
If you love Oreos and you enjoy playful desserts, Oreo Sushi Rolls are about to be your new favorite treat. They look like sushi, but they taste like a cookies-and-cream dream. No baking, no special tools—just a few pantry staples and a rolling pin.
This is a great recipe for kids, parties, or anyone who likes fun, bite-sized desserts. The best part? They come together fast and look impressive on a platter.
What Makes This Recipe So Good

- Quick and no-bake: You can make a batch in 20 minutes with zero oven time.
- Minimal ingredients: Oreos, milk, and a creamy filling—simple and budget-friendly.
- Kid-friendly: Perfect for little helpers, from smashing cookies to rolling the “sushi.”
- Customizable: Add sprinkles, peanut butter, or drizzle with chocolate to switch it up.
- Looks impressive: Neat, bite-sized rolls that mimic real sushi for a playful dessert spread.
Ingredients
- 24 Oreo cookies (regular, not Double Stuf; about 2 cups of crumbs)
- 2–3 tablespoons milk (whole or 2% works best)
- 4 ounces cream cheese, softened
- 2 tablespoons powdered sugar (add more to taste)
- 1/2 teaspoon vanilla extract
- Optional toppings: chocolate drizzle, white chocolate drizzle, rainbow sprinkles, crushed Oreos
- Optional “filling stripe”: 2 tablespoons peanut butter, Nutella, or strawberry jam
Step-by-Step Instructions

- Make Oreo crumbs: Place Oreos in a food processor and blend into fine crumbs. If you don’t have a processor, seal them in a zip-top bag and crush with a rolling pin until sand-like.
- Form a dough: Transfer crumbs to a bowl. Add milk 1 tablespoon at a time, mixing with a spoon or your hands. Stop when the mixture holds together like soft dough. It should be pliable, not sticky.
- Prepare the filling: In a separate bowl, beat softened cream cheese, powdered sugar, and vanilla until smooth and fluffy. Taste and adjust sweetness if needed.
- Roll out the “rice” layer: Lay a sheet of parchment paper on your counter. Place the Oreo dough on top and press into a rectangle, about 1/4 inch thick. Lay another piece of parchment over it and gently roll to even it out. Aim for a rectangle around 8×10 inches.
- Spread the filling: Remove the top parchment. Gently spread the cream cheese mixture over the dough, leaving a 1/2-inch border on the top edge to help seal the roll.
- Add a flavor stripe (optional): For a sushi-like look, add a thin line of peanut butter, Nutella, or jam along the bottom third of the rectangle.
- Roll it up: Starting from the bottom (the edge with the stripe, if using), use the parchment to help tightly roll the dough into a log. Press lightly as you go to avoid gaps. Seal the seam by pressing it closed.
- Chill to set: Wrap the log in parchment or plastic wrap and refrigerate for 20–30 minutes. This makes slicing cleaner.
- Slice into sushi pieces: Unwrap and use a sharp knife to slice 3/4- to 1-inch rounds. Wipe the knife between cuts for neat edges.
- Decorate: Drizzle with melted chocolate or white chocolate. Add sprinkles or a pinch of crushed Oreos on top. Let the drizzle set for a few minutes.
- Serve: Arrange on a platter like sushi. If you want to go all-in on the theme, serve with a small dish of chocolate sauce as “soy sauce.”
Storage Instructions
- Refrigerator: Store slices in an airtight container for up to 3 days. Place parchment between layers to prevent sticking.
- Freezer: Freeze in a single layer until firm, then transfer to a container. Thaw in the fridge for 30–45 minutes before serving. Best within 1 month.
- Make ahead: You can make the log a day ahead, keep it wrapped in the fridge, and slice right before serving.
Benefits of This Recipe
- No special equipment: A bowl and a rolling pin (or even a bottle) are all you need.
- Party-friendly: Easy to scale up and great for birthdays, game nights, or potlucks.
- All-season treat: No oven heat in summer, but still festive enough for holidays.
- Budget-conscious: Uses inexpensive, widely available ingredients.
- Creative outlet: Kids and adults can customize toppings and fillings for a fun activity.
What Not to Do
- Don’t overdo the milk: Too much liquid makes the dough sticky and hard to roll. Add just enough for it to hold together.
- Don’t skip chilling: Warm dough and filling lead to messy slices. A short chill gives you clean cuts.
- Don’t use Double Stuf for the dough: The extra cream can throw off the texture. Regular Oreos work best.
- Don’t spread filling all the way to the top edge: Leave a small border to help seal the roll.
- Don’t press too hard when slicing: Use a sharp knife and gentle sawing motions to avoid squashing the rolls.
Recipe Variations
- Mint Oreo Sushi: Use Mint Oreos and add a drop of peppermint extract to the filling. Top with a white chocolate drizzle.
- Peanut Butter Cup Roll: Spread a thin layer of peanut butter inside and sprinkle with chopped mini peanut butter cups before rolling.
- Cookies-and-Cream Cheesecake Roll: Fold crushed Oreos into the cream cheese filling for extra crunch.
- Fruity Stripe: Add a stripe of strawberry or raspberry jam. Top with white chocolate and a few freeze-dried berry crumbs.
- S’mores Style: Mix a spoonful of marshmallow creme into the filling and sprinkle mini chocolate chips on top. Finish with a graham cracker dusting.
- Gluten-Free Option: Use gluten-free sandwich cookies and check that your toppings are gluten-free.
- Dairy-Free Twist: Swap cream cheese for a dairy-free version and use a splash of non-dairy milk.
FAQ
Can I make this without cream cheese?
Yes. Swap in a thick frosting, a whipped topping stabilized with a little powdered sugar, or a dairy-free cream cheese. Peanut butter or Nutella also work as a single filling, though the rolls will be richer.
How do I keep the roll from cracking?
Make sure the dough is moist enough to be pliable. If it looks crumbly, add a tiny splash of milk and knead lightly. Rolling with parchment and not pressing too hard helps prevent cracks.
Why are my slices squishing when I cut them?
Chill the log longer and use a sharp, clean knife. Wipe the blade between cuts and slice with gentle, sawing motions rather than pressing straight down.
Can I use flavored Oreos?
Absolutely. Flavors like Golden, Birthday Cake, or Mint all work. Just note that very sweet varieties might need less sugar in the filling.
Do these need to be refrigerated?
Yes. Because of the cream cheese filling, keep them chilled until serving. They can sit out for up to 1–2 hours at room temperature.
How far in advance can I make them?
You can make and chill the whole log up to 24 hours ahead, then slice just before serving. Sliced pieces are best within 2–3 days.
Can I color the filling?
Yes. Add a drop or two of gel food coloring to the cream cheese mixture for a fun sushi look—think pastel pink or green.
What if I don’t have a rolling pin?
Use a clean wine bottle or press the dough flat with your hands between two sheets of parchment. Aim for an even thickness.
Final Thoughts
Oreo Sushi Rolls are a playful, no-stress dessert that always gets a reaction. They’re easy to make, easy to customize, and easy to share. Whether you’re hosting friends or making a fun snack with kids, this little twist on a classic cookie checks every box.
Keep a pack of Oreos on hand, and you can whip up a tray anytime. Simple, sweet, and just the right amount of clever.
Oreo Sushi Rolls
Ingredients
- 24 Oreo cookies (regular, not Double Stuf; about 2 cups of crumbs)
- 2–3 tablespoons milk (whole or 2% works best)
- 4 ounces cream cheese, softened
- 2 tablespoons powdered sugar (add more to taste)
- 1/2 teaspoon vanilla extract
- Optional toppings: chocolate drizzle, white chocolate drizzle, rainbow sprinkles, crushed Oreos
- Optional “filling stripe”: 2 tablespoons peanut butter, Nutella, or strawberry jam
Instructions
- Make Oreo crumbs: Place Oreos in a food processor and blend into fine crumbs. If you don’t have a processor, seal them in a zip-top bag and crush with a rolling pin until sand-like.
- Form a dough: Transfer crumbs to a bowl. Add milk 1 tablespoon at a time, mixing with a spoon or your hands. Stop when the mixture holds together like soft dough. It should be pliable, not sticky.
- Prepare the filling: In a separate bowl, beat softened cream cheese, powdered sugar, and vanilla until smooth and fluffy. Taste and adjust sweetness if needed.
- Roll out the “rice” layer: Lay a sheet of parchment paper on your counter. Place the Oreo dough on top and press into a rectangle, about 1/4 inch thick. Lay another piece of parchment over it and gently roll to even it out. Aim for a rectangle around 8x10 inches.
- Spread the filling: Remove the top parchment. Gently spread the cream cheese mixture over the dough, leaving a 1/2-inch border on the top edge to help seal the roll.
- Add a flavor stripe (optional): For a sushi-like look, add a thin line of peanut butter, Nutella, or jam along the bottom third of the rectangle.
- Roll it up: Starting from the bottom (the edge with the stripe, if using), use the parchment to help tightly roll the dough into a log. Press lightly as you go to avoid gaps. Seal the seam by pressing it closed.
- Chill to set: Wrap the log in parchment or plastic wrap and refrigerate for 20–30 minutes. This makes slicing cleaner.
- Slice into sushi pieces: Unwrap and use a sharp knife to slice 3/4- to 1-inch rounds. Wipe the knife between cuts for neat edges.
- Decorate: Drizzle with melted chocolate or white chocolate. Add sprinkles or a pinch of crushed Oreos on top. Let the drizzle set for a few minutes.
- Serve: Arrange on a platter like sushi. If you want to go all-in on the theme, serve with a small dish of chocolate sauce as “soy sauce.”